Tactile Topography
New Heights for Old Maps
There’s something special about topographic maps. Each is different than the next, yet many reflect a canvas replete with smooth contours, pleasing colors, and a technical accuracy that can send both the mind and feet wandering.
It is hard to imagine improving the natural aesthetic that topographic maps tend to convey. But Scott Reinhard did just that. By adding elevation data, realistic and atmospheric lighting, and rendering the map anew as a 3D model, Reinhard lifted the contours and topographic relief off the page.
Raised-relief maps are not new. Many classrooms and school hallways are still decorated with yellowed, brittle, and bumpy maps that have shown their age long ago. Physical versions of maps with terrain you could actually touch have been made for over 2,000 years. Some more recent varieties are so large you can walk around them.
I was inspired by the digital renders, both as a thing of beauty and as an experiment in process. So I pulled some data together and gave it a go.
Ashland 1953
Equipped with a 1953 USGS topo map featuring Wisconsin, Minnesota, and Michigan, along with Shuttle Radar Topography Mission (SRTM) data from USGS/NASA, I rendered the 3D topographic map below.
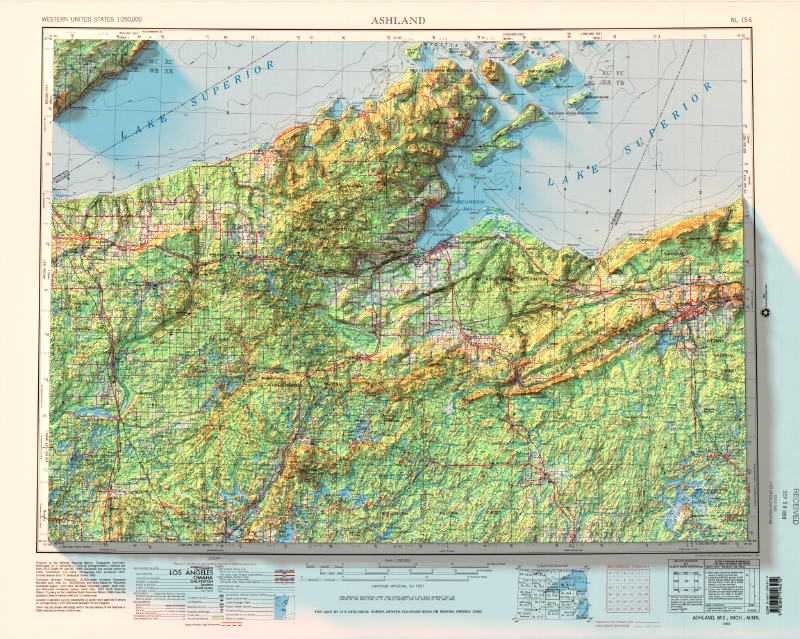
Lake Superior really is the greatest of lakes. Not shown in the map are some of my fondest memories spent near its shores. View larger and superior.
To compliment the blues and greens of the topo map, the scene is lit with warm light that casts cool shadows. I strived for something that looked like it was hung near a window of a quiet DNR office or game warden’s outpost, lit by a late afternoon sun. It does, I think.
Processing the data for these renders also reveals inconsistencies. Unsurprisingly, modern elevation data does not perfectly align with the the topographic maps of yesteryear. Still, the inaccuracy is quite subtle and only apparent to those who seek it. Some mismatch is technical (e.g., slight imperfection in the original georeferencing of the USGS topo maps). Some is geophysical; Earth undergoes constant change, most notably in coastlines and river courses. Such change is sure to have happened between 1953 and the SRTM collection in 2000. And some mismatch is plain practical. Different tools, different results. Ground surveys and space shuttles are, after all, different beasts.
And to tell you the truth, the more I work with Earth observations from space, the more I am impressed by the data collection and capabilities of our Earthbound predecessors.
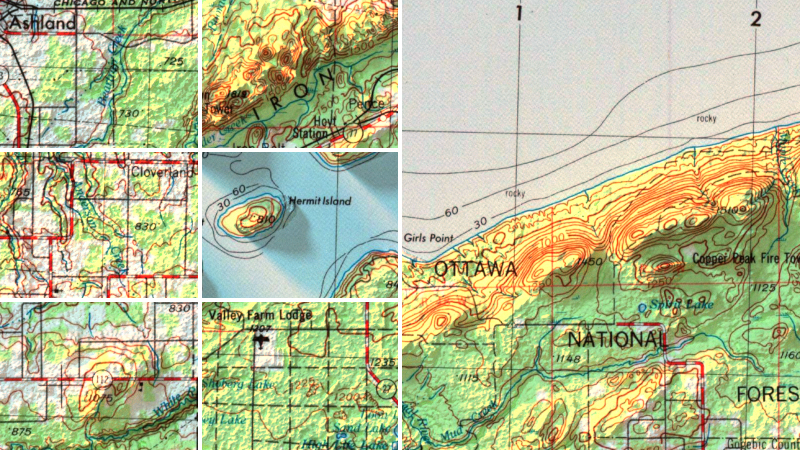
A selection of close-ups. In general, hills rise where they ought and not often where they're not.
This was a fun project to tinker with for a couple evenings. There are many variations on this type of display that I am excited to explore. Stay tuned!
A Brief Note on Process
In place of a lengthy tutorial, here is a brief rundown of what I did to create the map above. AKA, how to draw the owl:
Acquire a GeoTIFF of a USGS topo map that you like using topoView.
Grab some elevation data. 30-meter SRTM data is a great start. I recommend the 30m Tile Downloader from Derek Watkins.
(Optional) If you have multiple SRTM tiles, merge them with
$ gdal_merge.pyEnsure the elevation data is in the same projection as the topo map. (Use
$ gdalinfoto read the topo map’s metadata and then$ gdalwarpto reproject the elevation data to match.)Clip the elevation data to the extent of the topo map.
Double check the alignment of the data in Photoshop (or GIMP). Export an aligned elevation image in black (low elevations) and white (highest elevation). Use 16-bit color for this step! Otherwise the elevation data will be posterized to 256 values, resulting in a stairstep appearance once rendered.
Create a plane in Blender with the same aspect ratio as the topo map. Use the topo map for a color texture and the elevation image for a displacement map. Exagerate the displacement liberally. Position a sun (or three) at low angles to produce long shadows.
I hope looking at these maps brought you as much joy as I found in making them. Better yet, I hope you feel encouraged to make one of your own. And if you do, please share!