HDRI Lighting for Shaded Relief Maps
Shaded relief maps are among my favorite of all map types. Not only do they form the foundation for many other maps and derivative layers, they present a fascinating challenge: depicting an abstraction of terrain in a natural way while balancing accuracy with aesthetics.
This push and pull between modeling a natural phenomenon (the illumination of Earth and the shadows cast by the sun) with artistic purposes has captivated cartographers for centuries. It’s no surprise that as technology advanced, so too did the modeling of the sun’s rays. With this in mind, I wondered how techniques in 3D ray tracing carry over to shaded relief mapping.
Shaded Relief
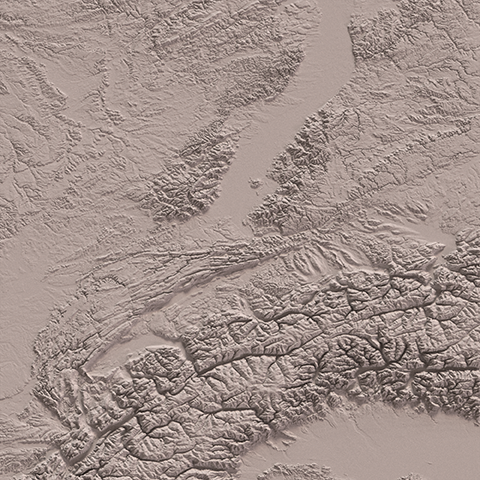
In common GIS software, relief mapping is made relatively easy. Typically, the user inputs a Digital Elevation Model (DEM) and specifies some parameters for the sun - most often its altitude, azimuth, and ambient strength. The software then decides, based on a simulation of light cast with these properties, which features of the elevation model are lit and which are not. This process forms a gradient of shadows and highlights that reveal the structure of the terrain, based on the height of the terrain and how directly it faces the source of the light.
There is a major drawback to this process in common GIS software: it only identifies which terrain features are lit directly by the sun, and how strongly each is lit. In the natural world, light does not terminate once it strikes an object - it reflects. The reflected ray, now slightly diminished in strength, might then strike another feature. Again, the ray is reflected, and this process continues until the angle of reflection sends the ray skyward or the light has been absorbed.
Ray Tracing
Accurately modeling the bouncing of light across objects, and how it reflects, refracts, and depletes is known as ray tracing in the 3D modeling world. In 3D modeling and rendering software, one has much greater control over light sources than is provided by most GIS software. In addition to simulating light rays more accurately, most 3D modeling software can depict various textures to further refine how light behaves. For instance, you could specify your terrain to be shiny, diffuse, or even to emit its own light. As a result, 3D applications are an attractive alternative for shaded relief mapping.
Daniel Huffman has a great tutorial series showing how this can be done in Blender, an open source 3D modeling application. The results are superb and I highly recommend the technique.
Ray tracing is typically done with one (or more) kinds of light sources. In Blender, there are 5 types of light sources - or “lamps.” A point lamp emits light spherically in all directions. A spot lamp directionally aims light, similar to a flashlight. An area lamp emits light from a planar surface. A hemi lamp emits light in a 180° arc, and a sun lamp mimics (you guessed it) the sun. The sun lamp attempts greater realism by eliminating the distant falloff of light that occurs with the other lamps.
Each of these light sources have various parameters that can be adjusted, such as size, distance, intensity, direction, and color (note that distance is irrelevant when using the sun lamp). The lamps also emit light with different behaviors which produces very different results during ray tracing. For instance, illuminating a DEM with a small point light will create sharp highlights nearest the source with an obvious dimming at greater distances:
A DEM ray traced using a small, low intensity point light. Yuck!
We can mitigate this effect slightly by increasing both the size and intensity of the point light. Increasing the size will more evenly light the area at all distances, though the light will become quite dull and weak. To compensate, the intensity of the light also needs to be increased. Doing so produces the following result:

A DEM ray traced using a large, high intensity point light. Meh...
The result above is a little better, but the shadows in the southeast still indicate their distance from the light. Let’s crank up the intensity some more:
A DEM ray traced using a large, very high intensity point light. Slightly better.
Overall there is some improvement, but again, it is evident that the terrain nearest the light is being lit more brightly than distant features. We could theoretically keep increasing the distance of the point light, while ramping up its intensity, to provide fully uniform lighting.
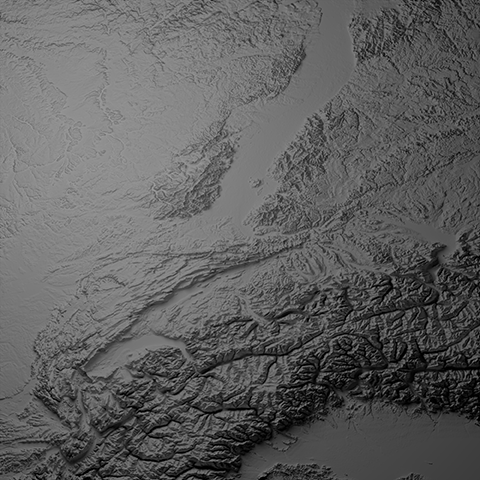
Or we could just use the sun lamp, which increasing the distance and intensity of the point lamp would only approximate. When using the sun lamp, we gain more even lighting and a rather realistic depiction of shadows. Notice the increased range of shadows in the highlighted region:
Using the sun lamp produces a much better result, with clearer indications of reflected light from a completely uniform source.
Using a ray traced sun produces a relief map that is incredibly well lit. It has smooth gradations between light and dark while persevering highlighted peaks and deep, dark shadows where necessary. With a few minor tweaks, I would be very happy with this version.
High Dynamic Range Imagery
Before becoming a cartographer, creating 3D scenes in Lightwave was my hobby. For side projects, I’d create 3D meshes for others to buy and use in their own projects. One of the best ways to advertise the quality of a model was to render it in a stunningly well-lit environment. Since it would take a lot of time to model a forest, or a futuristic kitchen full of appliances, I stumbled across a shortcut: HDRI probes.
HDRI, or High Dynamic Range Imaging, is a method for capturing photos with a significantly greater range of luminosity than is typical of conventional photography. When combined with a file format (.hdr) that stores more data per pixel than the average image format, it becomes possible to retain an enormous amount of the light-emitting properties of a photo.
Since HDR images are so luminous, 3D modelers often use them to light their scenes. This technique has three primary advantages:
Instead of lighting objects in a uniform color, as is done in GIS software and single-source 3D techniques, HDR images emit both light and color.
HDR lighting greatly reduces rendering time. Since the equivalent in a fully modeled world would require numerous objects and multiple “bounces” of light, cutting out these steps saves a ton of time.
With effective depth-of-field, HDR images can serve as the backdrop of a scene.
The last item isn’t really important for relief mapping since we often depict terrain orthographically, so the area surrounding the terrain is out of view. But the first two are incredibly useful.
Using HDRI Lighting for Shaded Relief
Using HDR images as a light source first requires a probe. These are HDR photos, often of spheres with a mirror surface, that can be projected onto other surfaces. By reprojecting the image back onto the inside of a hollow sphere, you can mimic the environment and ambient light sources of the original scene. The example below shows an HDR probe of Galileo’s Tomb, and a scene rendered using that probe. There are no other light sources in the scene; everything is lit with ambient light as if it sat in the same room in which the probe was taken:
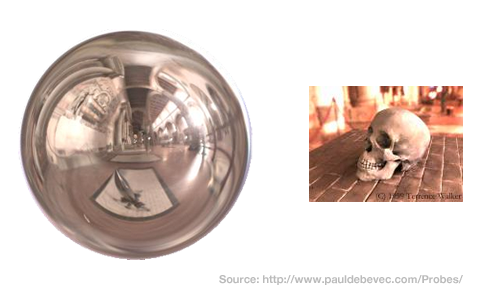
An HDR probe of Galileo's Tomb (left) and a mesh rendered using the probe as a light source. Images from Paul Debevec
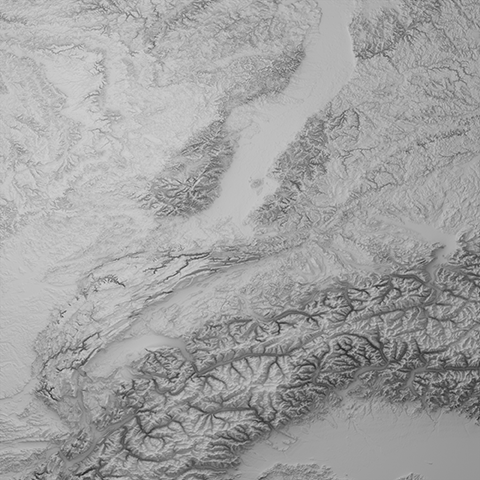
What would a shaded relief look like using this technique? To find out, I created a scene in which the DEM was lit by Galileo’s Tomb (a fitting example for a geographic study). When rendered using this HDR probe, the shaded relief looks like this:
The DEM rendered with an HDR probe of Galileo's Tomb. The terrain itself has no color (muted gray). The tone comes entirely from the HDR lighting.
Generally, this relief map looks a lot like the version rendered with the standard sun, though it is cast in the dominant color of the probe. Somewhat surprisingly, it is being lit from the northwest. I did not expect this, as HDR lighting illuminates the scene from all directions, with the strength dependent upon the light sources in the original images. The northwest lighting here is merely a convenient coincidence. If it had not occurred, we could easily rotate the probe within Blender to achieve the desired effect (or throw in a weak sun lamp to compensate).
When Things Go Awry
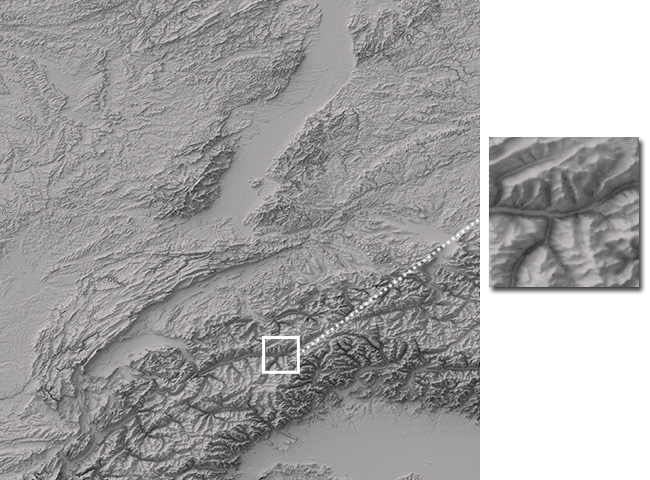
For another example, I rendered the DEM using a probe of a beach scene. This time the angle of lighting did not work in my favor out of the box. Initially the scene was completely lit from the top [A]. To add northwest highlights, I placed a sun lamp with a relatively flat angle of illumination in the scene [B]. Since the HDR probe can be reprojected and rotated, I also generated a version where the water was the dominant feature [C]. This cast everything in deep blue, which is interesting but not exactly what we want. Similarly, [D] is the result of orienting the probe with the sand overhead.

The DEM rendered with alterations of a beach scene as an HDR probe.
Both the dominant hue of the probe and its orientation strongly influence the lighting of the relief map. To show just how strong this effect is, I created a relief map using an HDR probe of a rainbow spectrum:
As if the world really needed another rainbow map... This one has a purpose, though :-)
In the relief map above, the entire scene is cast in a magenta hue. This is because HDR probes wrap in 360 degrees and when using a structured image (e.g., ordered hues) the leftmost pixels get stretched the most to complete the projection, resulting in an image that is mostly that color.
Conclusion
As I hope I’ve shown, HDR lighting can work for shaded relief mapping. Whether the relief map turns out adequately is highly dependent on the source image for the probe. But all in all, it is an interesting process and one I look forward to exploring more.
Even when it works well, as in my first Galileo example, the final product is still cast in the dominant hue of the probe. So why would you ever want this in shaded relief maps, which generally remain completely neutral?
I have three reasons why you might want to (your mileage may vary):
Every event occurs at some location. Similarly, every event also happens at a time. The combination of both space and time is often missing from most maps; this is especially true for shaded relief maps. Although there is value (and convenience) in depicting relief while ignoring time, I find there is an attraction in representing relief that hints at the passage of time. With HDR, one could generate relief maps that accurately depict the half light of dawn or an aurora passing overhead.
Even the phenomenal results of using a ray traced sun lacks the realism of natural light. Atmospheric scattering, ambient reflections, and the azure tinting of the environment that happens at great distances is wholly absent. With little effort, HDR lighting could provide some of these.
Because you can.
In the end, it was just fun to explore different lighting techniques. This project began as an attempt to scratch the itch of curiosity, and although there are mixed results, I think HDR lighting for shaded relief shows potential - particularly for item 2 above. As I get more time, I intend to investigate that a little further.
Until then, I hope this provokes some thought and generates ideas on how we can more realistically (and even artistically) represent relief in maps with 3D software.